
If your laptop fan sounds like it’s preparing for takeoff, it’s trying to tell you something. Dust has been building up inside for months — maybe years — and the fan is working overtime to pull air through vents half-clogged with lint and pet hair. Learning how to clean laptop fan blades and vents is one of the simplest maintenance jobs there is, and the payoff is immediate: quieter operation, cooler temperatures, and a laptop that stops throttling itself every time you open Chrome.
The basic version takes ten minutes and a can of compressed air. The deep-clean version — opening the back panel — takes a bit more nerve, but I’ll walk you through exactly when it’s worth it and how to avoid the mistakes that actually matter.
If your fan is loud but you’re not sure dust is the real culprit, check out why a laptop fan gets loud to rule out other causes. And once the inside is handled, don’t forget the outside — our guide to how to clean your laptop keyboard safely covers the grime that collects under your fingertips.
Why a Dirty Fan Slows Down Your Whole Laptop
Your laptop’s CPU and GPU dump heat into copper heat pipes, and the fan’s job is to pull cool air in and push hot air out. When dust mats onto the fan blades and clogs the heatsink fins, airflow drops, temperatures climb — and modern laptops from Dell, Lenovo, HP, and Apple protect themselves by slowing the processor down. That’s called thermal throttling.
So that sluggish performance you’ve been blaming on Windows 11? It might be dust. Machines often drop 15–20°C under load after a proper fan cleaning — the difference between a fan screaming at full speed and one you can barely hear.
Signs your fan needs attention: the fan runs loud constantly, even during light work; the keyboard or bottom panel gets uncomfortably hot; the laptop shuts down during heavy tasks (thermal protection kicking in); or you can see dust matted across the intake vents.
What You’ll Need
For the quick method:
- A can of compressed air — the kind sold for electronics (brands like Falcon Dust-Off). Hold it upright so no liquid propellant sprays out.
- A soft brush — an anti-static brush or a clean, dry paintbrush with soft bristles.
For the deep clean, add a small Phillips-head screwdriver (usually #0 or #1), a plastic spudger or old credit card for popping clips, and cotton swabs for the blades.
Skip the vacuum cleaner: the airflow can spin the fan past its rated speed, and static from the hose can damage motherboard components. Compressed air is the safe tool.
Method 1: How to Clean Laptop Fan Without Opening It
This is where everyone should start. It takes five minutes and carries essentially zero risk.
- Shut the laptop down completely and unplug it. Not sleep — a full shutdown, charger removed.
- Find the vents. Intake grilles are usually on the bottom; the exhaust sits on the side or rear. Blast air out through the exhaust and away from the intake.
- Hold the fan still if reachable. If you can see the fan through a vent, wedge a toothpick through the grille so the blades can’t spin. This is the single most important safety detail — a fan spun up by compressed air can damage its own bearings.
- Blast in short bursts. Hold the can upright, about 15 cm away, using 1–2 second bursts while moving along the vent, so you push dust out rather than driving it deeper.
- Let it sit a few minutes for any propellant residue to evaporate, then power on and listen. If the fan still howls under light load, the dust is packed deeper — time for Method 2.
Method 2: The Deep Clean (Opening the Back Panel)
If the quick blast didn’t quiet things down, or your laptop is three-plus years old and has never been opened, a deep clean is worth the extra twenty minutes. Fair warning: opening the chassis can void the warranty on some models, so check your warranty status first — particularly on machines less than a year old.
Before you start: shut down, unplug, and if the battery is removable, take it out. Work on a clean, well-lit table. Keep the screws organized — bottom-panel screws are often different lengths, and mixing them up is the classic rookie mistake.
- Remove the bottom panel. Unscrew the back screws and gently work around the edges with the spudger. Don’t force anything; if a corner resists, you missed a screw hiding under a rubber foot.
- Disconnect the internal battery. Most modern laptops have a small battery cable clipped to the motherboard — unclip it before touching anything else. This is the step that separates a safe job from a risky one.
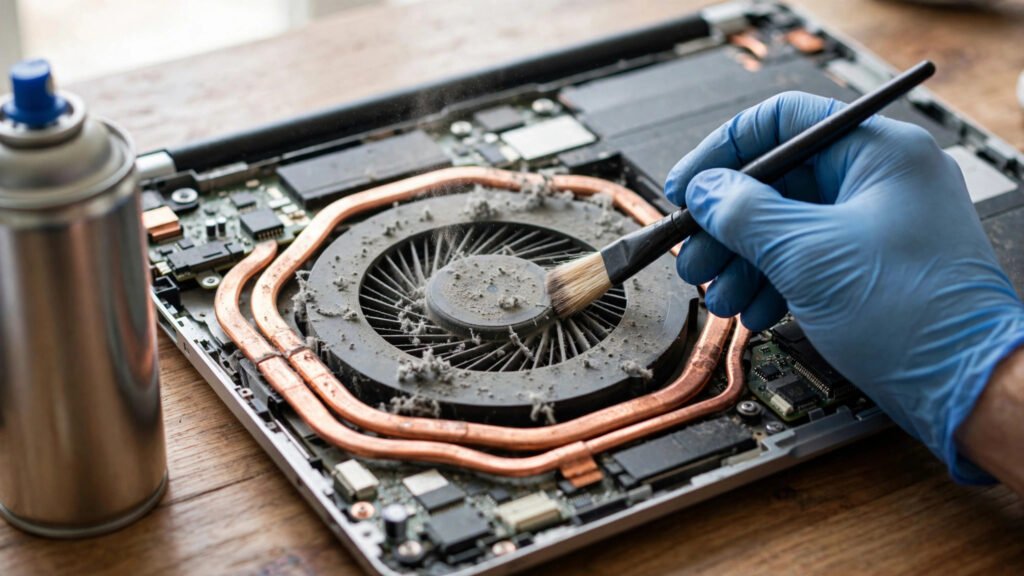
- Locate the fan and heatsink. The dust will be obvious: a grey mat packed around the blades and clogging the fins behind them.
- Hold the blades and brush. With a finger or toothpick keeping the fan from spinning, brush the blades gently, sweeping dust outward. Follow with short compressed-air bursts, blades still held.
- Clean the heatsink fins. Brush them carefully and blow air through them in the normal airflow direction (in from the intake side, out the exhaust).
- Reassemble and test. Put the panel back on, boot up, and check temperatures with a free tool like HWMonitor or Core Temp. Compare idle and load temps to before, if you recorded them.
iFixit has free teardown guides for hundreds of specific models — check for yours before starting, since screw placement and clip styles vary a lot between, say, an ASUS ROG gaming laptop and a MacBook.
Mistakes That Actually Damage Laptops
Most “don’ts” are overcautious, but these three are real:
- Letting the fan spin freely under compressed air. This can wreck the bearings. Always hold the blades still.
- Spraying liquid. Tipping the can sideways releases liquid propellant that can short components. Short bursts, can upright, full stop.
- Forcing the chassis open. Cracked clips and stripped screws are the most common DIY casualties. If something won’t budge, there’s a screw or latch you haven’t found yet.
For brand-specific variants like “how to clean laptop fan hp” or Dell/Lenovo, the procedure is identical — only the disassembly differs. Search iFixit or YouTube for your exact model number (on the bottom sticker) and you’ll usually find a teardown video in the first few results.
How Often Should You Do This?
A quick compressed-air clean every 6 months, and a deep clean every year or two. If you use the laptop on a bed or sofa (which blocks the intake vents), have pets, or live somewhere dusty, halve those intervals. Gaming laptops, which run hotter and pull more air, deserve the aggressive schedule too.
One habit that pays off: use the laptop on a hard, flat surface whenever you can. A laptop stand improves airflow enough that the fan simply runs less — less dust pulled in, longer gaps between cleanings.
If your machine still runs hot after a thorough cleaning, our guide to fixing laptop overheating walks through nine more proven solutions. And if the whole machine still feels sluggish, these tips to speed up an old laptop can restore a surprising amount of performance.
FAQ
Can I clean my laptop fan without opening it?
Yes. Short bursts of compressed air through the intake and exhaust vents remove most surface dust, and that’s enough to fix noise and heat in many cases. Keep the can upright, hold the fan blades still if reachable, and never use a vacuum. If the fan still runs loud afterward, the dust is packed deeper and the back panel needs to come off.
Do laptop fans need to be cleaned?
Eventually, yes. Every laptop pulls in airborne dust with cooling air, and it accumulates on blades and heatsink fins over months and years. Machines never cleaned after 2–3 years often run 10–20°C hotter than they should, which triggers thermal throttling and shortens component life.
My laptop fan isn’t spinning. What should I do?
First figure out whether it’s a dust problem or a dead fan. If the laptop overheats and shuts down but you never hear the fan, the motor may have failed — cleaning won’t fix that. If the fan spins weakly or intermittently, try a deep clean before ordering parts. Also check the manufacturer’s control app (Lenovo Vantage, HP Omen Gaming Hub) — a “quiet mode” setting can mask the real behavior.
How do I clean the dust out of my laptop without compressed air?
A soft brush through the vents and tweezers for lint in the intake grille are better than nothing, but compressed air does the real work — a can costs a few dollars and lasts for many cleanings. Don’t blow with your mouth; the moisture in your breath is worse than the dust.
Conclusion
A noisy, overheating laptop is usually a dusty laptop, not a dying one. The five-minute compressed-air method solves the problem outright more often than you’d expect; the deep clean, with the fan blades held still, restores even a years-neglected machine. Make it a twice-a-year habit, keep the vents off soft surfaces, and your laptop will run quieter and longer — no upgrade required.